
General Maintenance
Select any area of concern from the list below:
Back - Legs - Hands
General Maintenance
Foam Rolling for Maintenance
Foam rolling is a type of self-myofascial release technique that helps to alleviate tension and tightness in the muscles and fascia (the connective tissue surrounding muscles). By rolling specific muscle groups over the foam roller, you can help to increase blood flow and oxygen to the tissue, which aids in recovery, increases flexibility, reduces muscle soreness, and improves overall performance. Additionally, foam rolling can also be beneficial as part of a warm-up routine, preparing the muscles for exercise, or as part of a cool-down routine, helping to speed up recovery after physical activity.
Always remember:
Never roll directly on a joint or bone.
Never roll on an area that is injured or causes sharp pain.
Always relax as much as possible on the roller.
Tensing up can cause muscles to tighten, which defeats the purpose of the exercise.
Aim for a moderate pressure and increase as your tolerance improves.
Don't rush through the process.Take your time and remember that slower, controlled movements are more effective.
Foam rolling can be uncomfortable, this is okay.
Areas that exhibit the most discomfort often require the most attention.
Back
Protocol
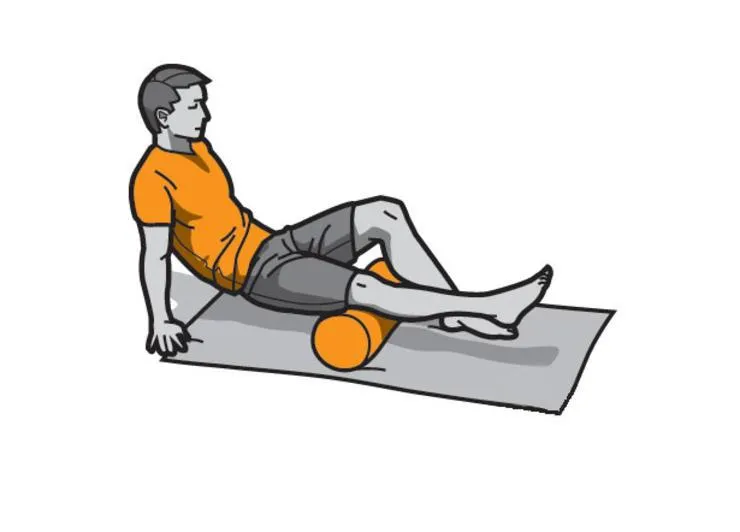
1. Start with the Glutes - Sit on the foam roller with your legs straight out in front of you. Place your hands on the floor behind you for balance.Shift your weight to one side, allowing the foam roller to massage one glute.Slowly roll back and forth over the glute.Repeat on the other side.
2. Piriformis - While still sitting on the foam roller, bend one knee and cross that ankle over the opposite knee in a figure-four position.Lean onto the side of the crossed ankle.Slowly roll back and forth to massage the muscle deep in the glute (the piriformis muscle).Repeat on the other side.
3. Upper and Mid Back - Lay down with the foam roller placed under your mid-back, perpendicular to your body.Bend your knees so that your feet are flat on the ground. Place your hands behind your head to support your neck, or cross your arms over your chest.Using your feet to control the movement, roll from the middle of your back up to your shoulder blades.
4. Mid Back Extensors - Position the foam roller along the length of your spine, running from head to tailbone.With the foam roller supporting your spine, lean slightly to one side to target the muscles just to the side of your spine (paraspinal muscles).Roll back and forth in small movements to massage these muscles.Repeat on the other side.
5. Lats - Lie on your side with your arm extended and the foam roller under your armpit.From there, roll the foam roller along the side of your torso, down to just above your waist.This should target the latissimus dorsi, the large muscle in your back.Repeat on the other side.
Remember, take your time with each exercise, focusing on areas that feel particularly tight or tender. Breathe deeply and keep your body relaxed to allow the foam roller to do its work. As always, stop any exercise that causes pain. Regular foam rolling can help maintain flexibility, relieve muscle tension, and enhance overall muscle performance.
Legs
Protocol
1. Calves - Sit on the floor with your legs straight in front of you and your hands on the floor behind you for support. Place the foam roller underneath your calves. The pressure should be distributed evenly. Slowly roll your body back and forth so the roller moves up and down your calves, from your ankles to below your knees. If you find a tender spot, pause there for a few seconds before continuing. To increase pressure, you can stack one leg on top of the other.
2. Hamstrings - Position the foam roller under your thighs. Using your hands for support, slowly roll from your knees up to your buttocks. Again, if you encounter a tender area, hold the position for a few seconds. As with the calves, you can stack one leg on top of the other to add pressure if needed.
3. Quadriceps - Lie face-down on the floor and place the foam roller under your thighs, while you rest on your elbows. Slowly roll your body so the roller moves up and down your thighs, from your hips to your knees. If you need more pressure, you can stack your legs.
4. IT Band - Lie on your side with the foam roller positioned under your hip, with your other leg crossed in front of you. Use your arms to lift your body and roll from the hip down to the knee, rolling along the outer thigh. This can be sensitive for many people, so use a moderate amount of pressure to begin.Repeat the process on the other side.
5. Adductors - Lie face-down with one leg extended out to the side, knee bent. Place the foam roller in the groin area of the extended leg and roll towards the knee. It's important to foam roll both legs, even if only one side is causing discomfort. You may find that the discomfort decreases as your body adjusts to the foam rolling routine.
Hand Maintenance
Protocol
1. Start with a classic Finger Stretch - Start with your fingers extended straight out.
Close your hand slowly, making a fist. Don't squeeze too tightly.Slowly open your hand back up until your fingers are straight once again.Perform this exercise 10 times on each hand.
2. Thumb Flex - Extend your hand out with your palm facing up.Bend your thumb inward toward your palm.Stretch the thumb as far as possible toward the base of the pinky finger.Hold this position for a couple of seconds, then return to the starting position.Repeat 10 times for each thumb.
3. Wrist Flexor Stretch - Extend one arm in front of you, with the palm up.Use the other hand to gently press down on the raised hand's fingers, stretching the wrist and fingers as far as it's comfortable.Hold this position for about 20-30 seconds.Repeat with the other hand.
4. Wrist Extensor Stretch - Extend one arm in front of you, palm facing down.Use the other hand to gently press the back of the hand down, stretching the wrist.Hold for 20-30 seconds.Repeat with the other hand.
5. Wrist Curl - Sit on a chair with your forearm resting on a table, holding a weight (such as a water bottle or a small dumbbell) with your palm facing upward.Bend your wrist upward, lifting the weight off the table.Lower the weight back down.Repeat this 10 times on each hand. If this is too easy, increase the weight or the number of repetitions.
6. Squeeze a Stress Ball - Hold a stress ball or similar object in one hand.Squeeze the ball and hold for a few seconds, then relax.Repeat 10-15 times for each hand.
Remember to always keep these exercises gentle.
General Maintenance
Department Specific
General Maintenance
Body Region Specific
General Maintenane
Contact
Email: Jason@manowarfitness.com
Address
Office: 175 W Lowry Lane, Lexington
Get In Touch
Assistance Hours
Mon – Fri 8:00am – 5:00pm
Phone Number:
859-227-8154
